Getting Started For Platforms
Based on organizational requirements, you may want to create separate Workspaces for each of your customers. In the Badge Platform, Workspaces provide data isolation. If you want to keep your customers' data separate we recommend using a new workspace for each of your customers. If you would prefer using a single workspace you can continue with the normal SDK setup.
Organization API RequiredIn order to follow this guide you will need access to the Organization API.
Please contact sales to request access.
Creating Workspaces
A workspace on the Badge platform acts as a data container, keeping data isolated. Steps in this guide should be repeated for each of your customers.
Create a Workspace
When you are granted organization access, you will receive an API token that can be used to create workspaces. This token is needed to access the create workspace API.
Use the Badge API to make a workspace for each of your customers:
POST https://api.trybadge.com/v0/workspaces HTTP/1.1
Accept: application/json
Authorization: Bearer ORGANIZATION_TOKEN
Content-Type: application/json

{
  "companyInfo": {
    "address": [
      "123 Faker St",
      "Arkadelphia, Arkansas 71923"
    ],
    "name": "ACME Group, Inc.",
    "supportEmail": "[email protected]"
  },
  "name": "ACME",
  "timezone": "America/New_York"
}{
"apiKey": "34238uQcwhUT"
}Save the value returned in apiKey for future api calls
Create an Apple Pass Type Identifier
In order to issue passes, Apple requires that you have an Apple Developer Program account. The Apple Developer Program is a paid subscription that enables distribution of apps and passes.
Apple Developer ProgramEnroll in the Apple Developer Program if you do not already have an account.
Once enrolled, follow the steps below so that you may begin issuing passes on the Badge platform.
In order to give your customers a seamless experience you can automate creation of Pass Type Identifiers through the Apple Appstore Connect API. Unfortunately, Apple does not allow use of this API by third parties but we have created some straight-forward API endpoints to help you integrate the two systems.
Would a library you can install to manage this be useful to you?Reach out to us in the chat and let us know what language and frameworks you are using!
API Credentials
In order to use the Appstore Connect API you need to get an API key from Apple :
-
In the Apple Developer Portal, navigate to Users & Accounts > Integrations
-
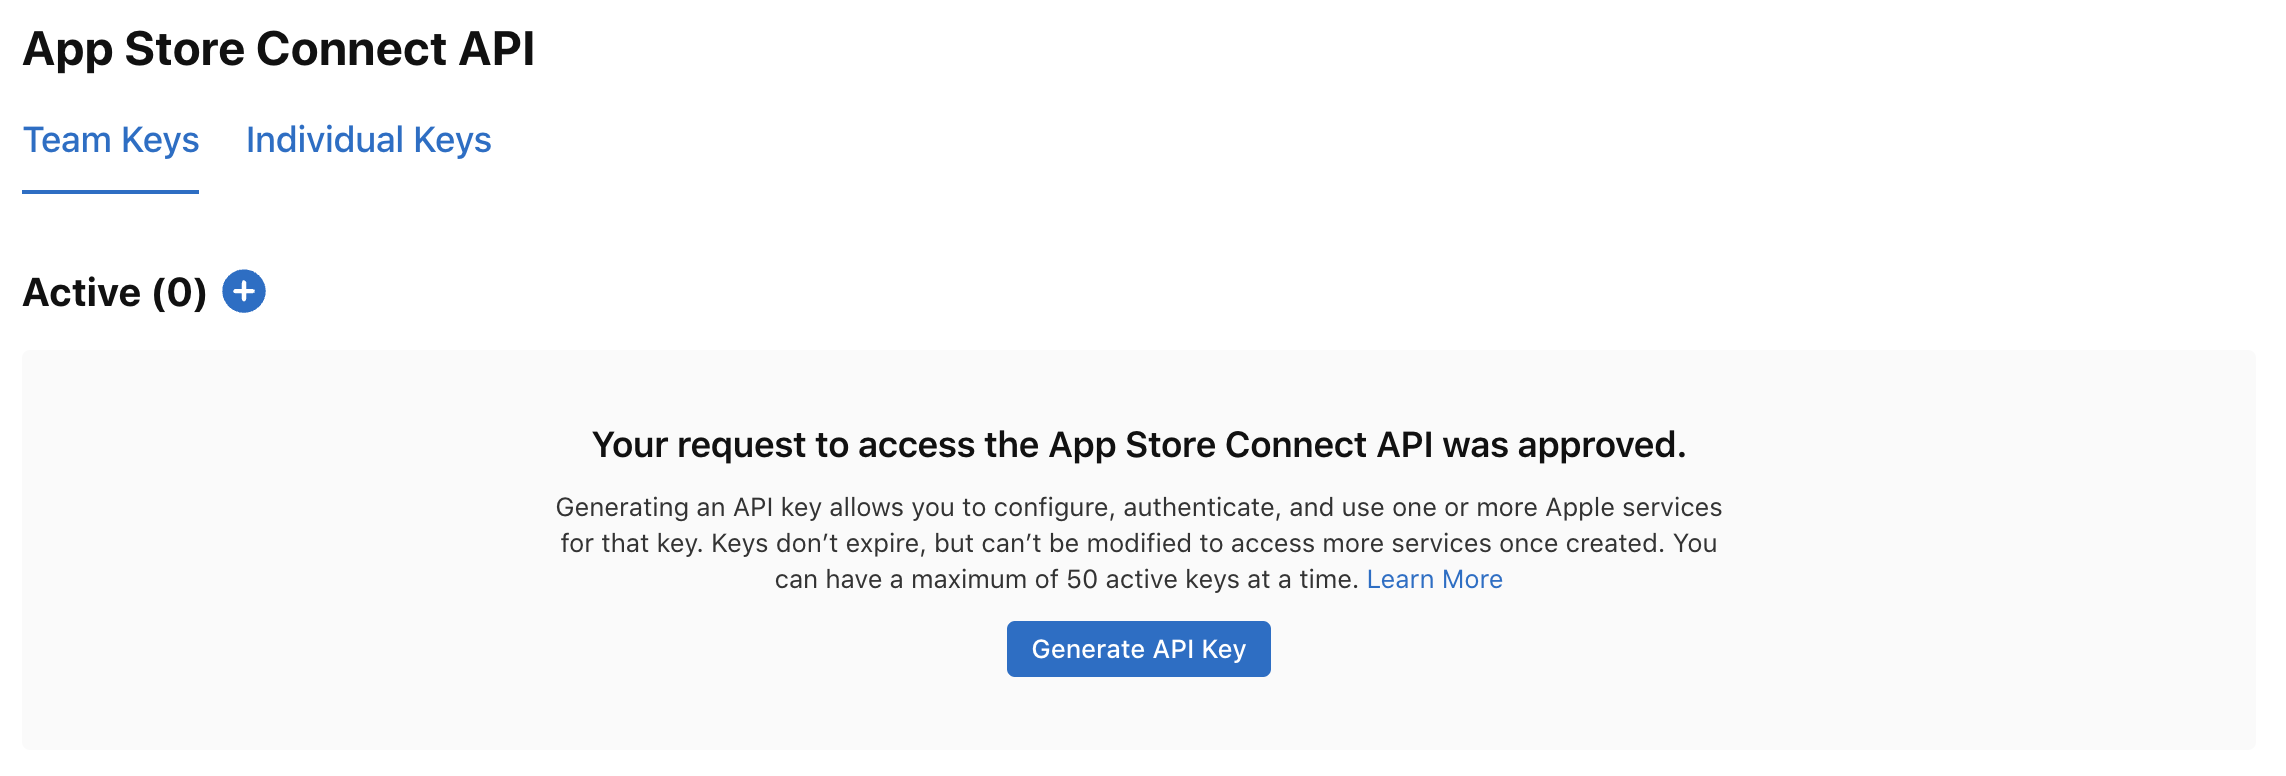
If you do not already have access click Request Access

-
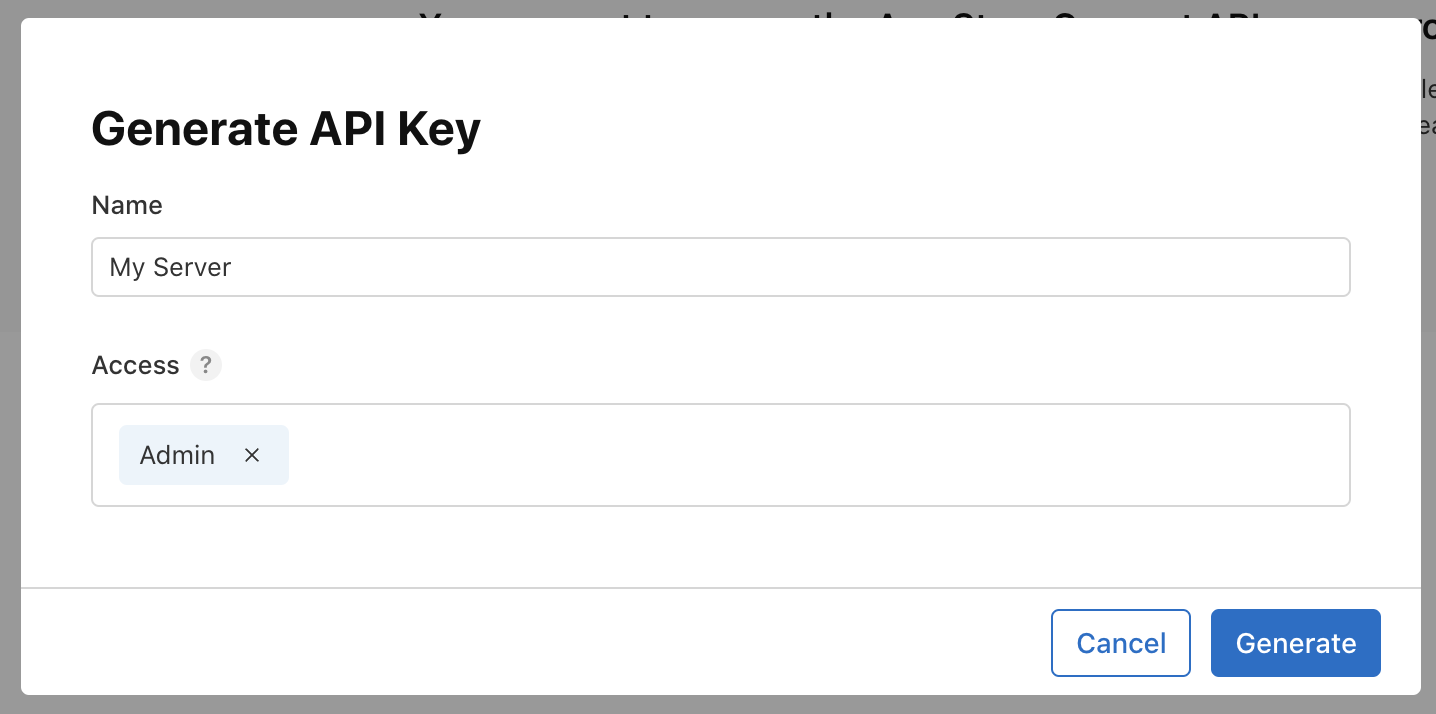
Once you have been granted access click Generate API Key

-
Enter a Name and select Admin under Access, then click Generate

-
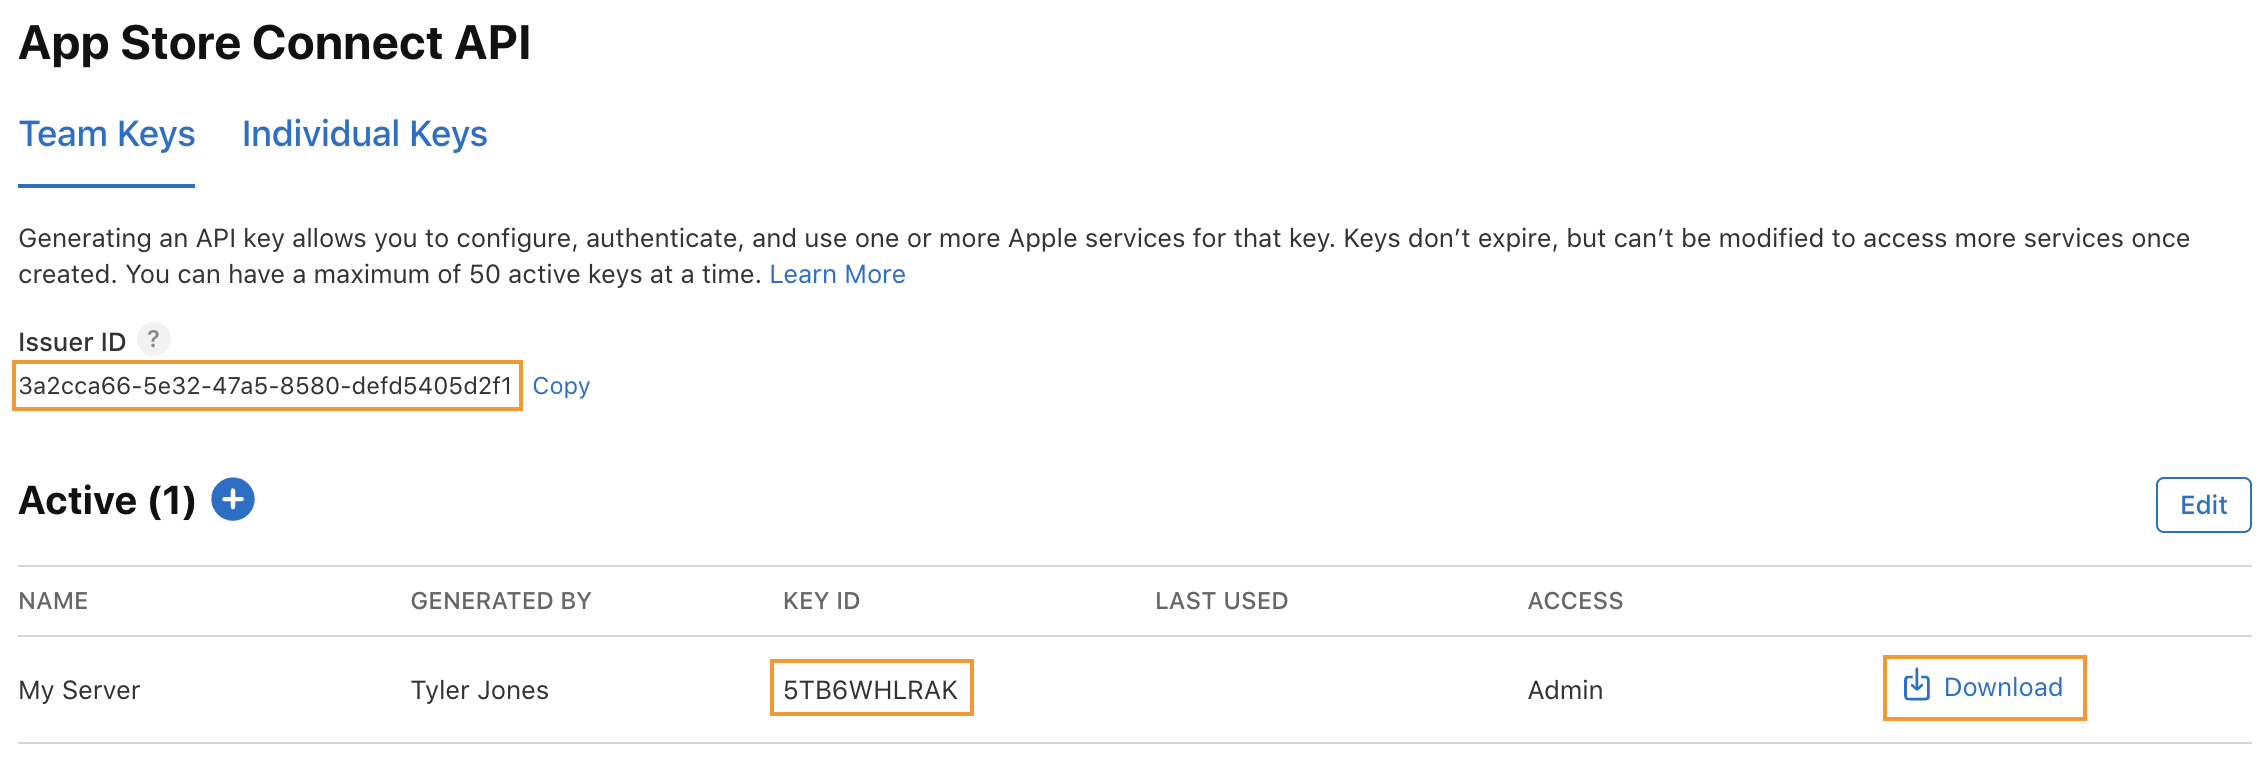
Make note of your key's identifiers and download the API Key

Signing a Request for the Apple Appstore Connect API
To make requests to the App Store Connect API you must generate tokens. Below is an example of how to generate a token using the API Key created in the previous step:
import * as jwt from "jsonwebtoken";

export function generateAppStoreConnectToken(
  issuerId: string,
  apiKeyId: string,
  privateKey: string,
): string {
  const tokenExpiryMs = Date.now() + TOKEN_VALIDITY_MS;

  const payload = {
    iss: issuerId,
    exp: Math.round(tokenExpiryMs / 1000),
    aud: "appstoreconnect-v1",
  };

  return jwt.sign(payload, privateKey, {
    algorithm: "ES256",
    header: {
      alg: "ES256",
      kid: apiKeyId,
      typ: "JWT",
    },
  });
}

const TOKEN_VALIDITY_MS = 5 * 60 * 1000; // 5 minutesimport {readFileSync} from "node:fs";
const token = generateAppStoreConnectToken(
"3a2cca66-5e32-47a5-8580-defd5405d2f1",
"5TB6WHLRAK",
readFileSync("/path/to/key/AuthKey_5TB6WHLRAK.p8", "utf8"),
);Create an Apple Pass Type Identifier
If there is already an identifier created that you want to use you can skip this step.
Use the App Store Connect API to create a Pass Type Identifier:
POST https://api.appstoreconnect.apple.com/v1/passTypeIds HTTP/1.1
Accept: application/json
Authorization: Bearer YOUR_APPLE_TOKEN
Content-Type: application/json

{
  "data": {
    "type": "passTypeIds",
    "attributes": {
      "name": "My Loyalty Pass",
      "identifier": "pass.com.example.loyalty"
    }
  }
}HTTP/1.1 200 OK
Content-Type: application/json
{
"data": {
"id": "N9UBABTV8T"
}
}Store data.id for the next step.
Get a Certificate Signing Request from Badge
Issuing a pass requires a signing certificate. Before you can generate a signing certificate, you need a certificate signing request (CSR).
Use the Badge API to create a CSR file:
POST https://api.trybadge.com/v0/workspace/appleCertificateSigningRequests HTTP/1.1
Accept: application/x-pem-file
Authorization: Bearer WORKSPACE_API_KEYHTTP/1.1 200 OK
Content-Type: application/x-pem-file
RAW CERTIFICATE DATAUse the response body of this request in the next step.
Upload the Certificate Signing Request to Apple
Use the App Store Connect API to create a certificate:
POST https://api.appstoreconnect.apple.com/v1/certificates HTTP/1.1
Accept: application/json
Authorization: Bearer YOUR_APPLE_TOKEN
Content-Type: application/json

{
  "data": {
    "type": "certificates",
    "attributes": {
      "csrContent": "RAW CERTIFICATE DATA FROM PREVIOUS STEP",
      "certificateType": "PASS_TYPE_ID"
    },
    "relationships": {
      "passTypeId": {
        "data": {
          "type": "passTypeIds",
          "id": "N9UBABTV8T FROM CREATE PASS TYPE IDENTIFIER"
        }
      }
    }
  }
}
If you have an identifier with NFC entitlement and you want to create NFC passes, use PASS_TYPE_ID_WITH_NFC in certificateType.
HTTP/1.1 200 OK
Content-Type: application/json

{
  "data": {
    "id": "SHCF2PMQCT",
    "attributes": {
      "certificateContent": "BASE64 ENCODED CERTIFICATE",
    }
  }
}
Use the data in data.attributes.certificateContent in the next step.
Upload Signed Certificate to Badge
Now that you have a certificate, the final step is to upload it to your Badge workspace.
Use the Badge API to upload the certificate to your Badge workspace:
POST  https://api.trybadge.com/v0/workspace/appleCertificates HTTP/1.1
Accept: application/json
Authorization: Bearer WORKSPACE_API_KEY
Content-Type: application/pkix-cert

BASE64 DATA FROM PREVIOUS STEPHTTP/1.1 200 OK
Content-Type: application/json
{
"passTypeIdentifier": "pass.com.example.loyalty"
}You've completed the Apple Certificate Upload process.
Create a Template
To get started, use the Badge API to create a new template for your customer:
POST https://api.trybadge.com/v0/passTemplates HTTP/1.1
Accept: application/json
Content-Type: application/json

{
  "passType": "LOYALTY",
  "revision": {
    "description": "User facing name",
    "logoUri": "https://example.com/logo.png",
    "backgroundColorHex": "#000000",
    "textColorHex": "#FFFFFF"
  },
  "publish": true,
  "name": "Test",
  "applePassTypeIdentifier": "pass.com.example.pass"
}HTTP/1.1 200 OK
Content-Type: application/json
{
"template": {
"id": "2e0f7fa5-80db-492d-a5fe-d22eab5a6ef2"
}
}Store the returned template.id as you will need it later when creating passes.
Creating Passes
If you are not ready to create passes you can skip this step.
Use the Badge API to create or update a pass:
POST api.trybadge.com/v0/rpc/userPassUpsert HTTP/1.1
Accept: application/json
Authorization: Bearer API_KEY
Content-Type: application/json

{
  "passTemplateId": "2e0f7fa5-80db-492d-a5fe-d22eab5a6ef2",
  "user":{
    "id": "66565"
  },
  "pass":{
    "id": "88787"
  }
}
pass.id can be omitted if you are only creating one pass per user.
HTTP/1.1 200 OK
Content-Type: application/json

{
  "pass": {
    "downloadUrl": "https://example.com/download?id=123&token=123"
  }
}
The returned pass.downloadUrl can be used to distribute passes.
Update the Template
If you need to make any additional changes to the template you can use the Badge API to create a template revision .
SDK Setup
Continue with the normal SDK setup.
Updated 11 months ago